How we Keep Track of our Listings on eBay and Easily Relist Them

eBay is a great system and a huge revenue stream for us. But when you are first starting out it is hard to keep track of all your listings, when they end, and when you need to relist them. The problem is that eBay will delete any listings that you list that are duplicates. Do this enough times and you may even be penalized. Their algorithms are so good that if you have multiple stores it may flag listing with the same title and pricing on an entirely different store.
We do a combination of fixed priced listings or GTC listings that only need to be relisted when all the items sell. We recommend these listings because they are easier to manage. Then we have about 20-30 auction style listings that last seven days that are low priced auctions so people can get to know us. On average we have to relist these auctions each week and about 30-100 GTC listings. The good news is that products are selling. The bad news is it takes time. But unless you are willing to spend the extra money or time to invest in a program to relist for you or you are just starting out and funds are limited then you will need to do it manually.
We have been doing it manually for a while now and it takes us about 30 minutes to relist all three of our stores each week.
Below is a brief tutorial and above a video on how we relist our listings on eBay:
First is Step 1 where while in ebay, and using seller manager pro, we open up three tabs, the Active listings, Unsold listings, and Sold listings.
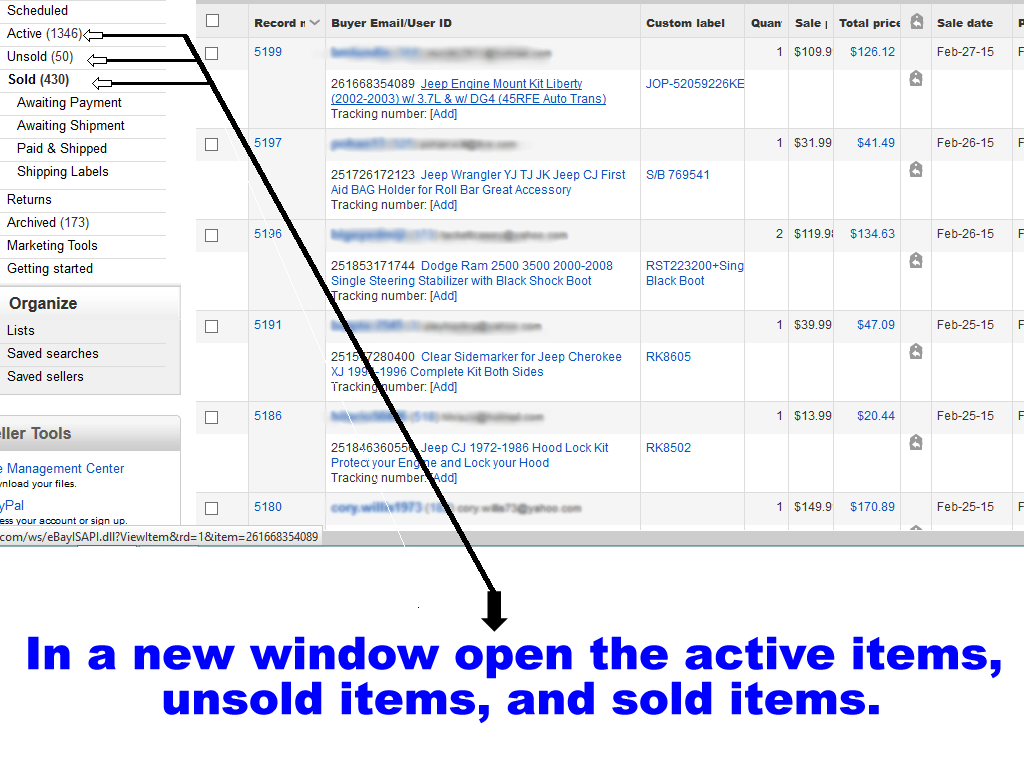
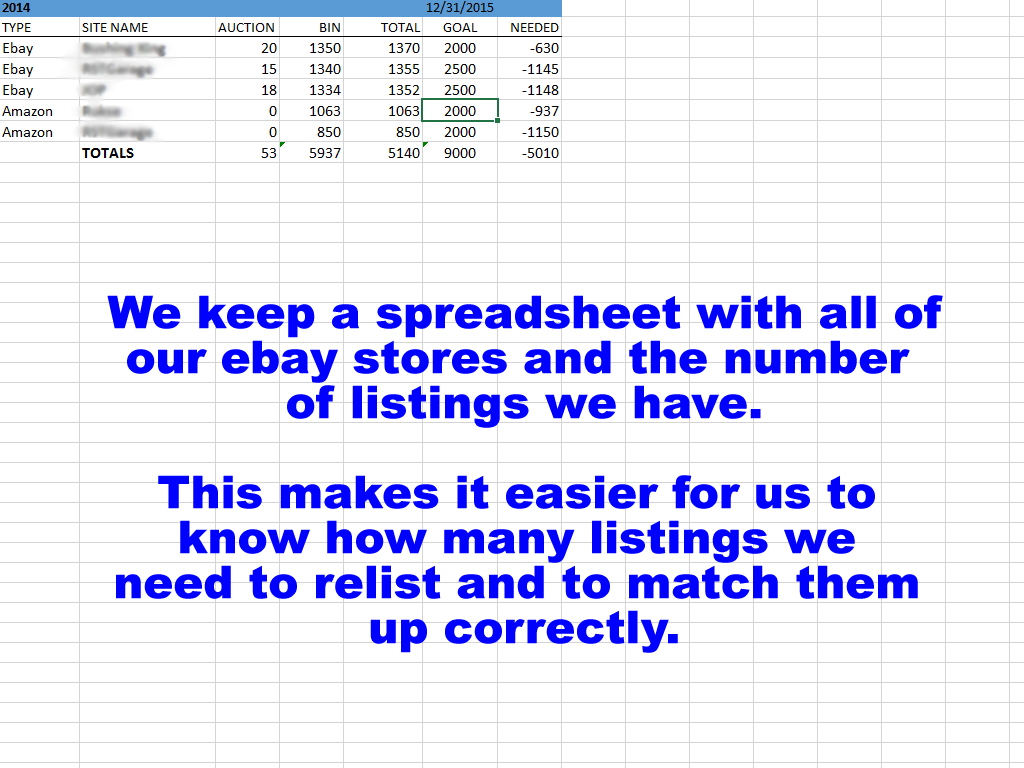
The next thing we do is compare what the active listings say we have versus our spreadsheet which says how many we need to get to. This will tell us how many listings and what kind we need to relist.
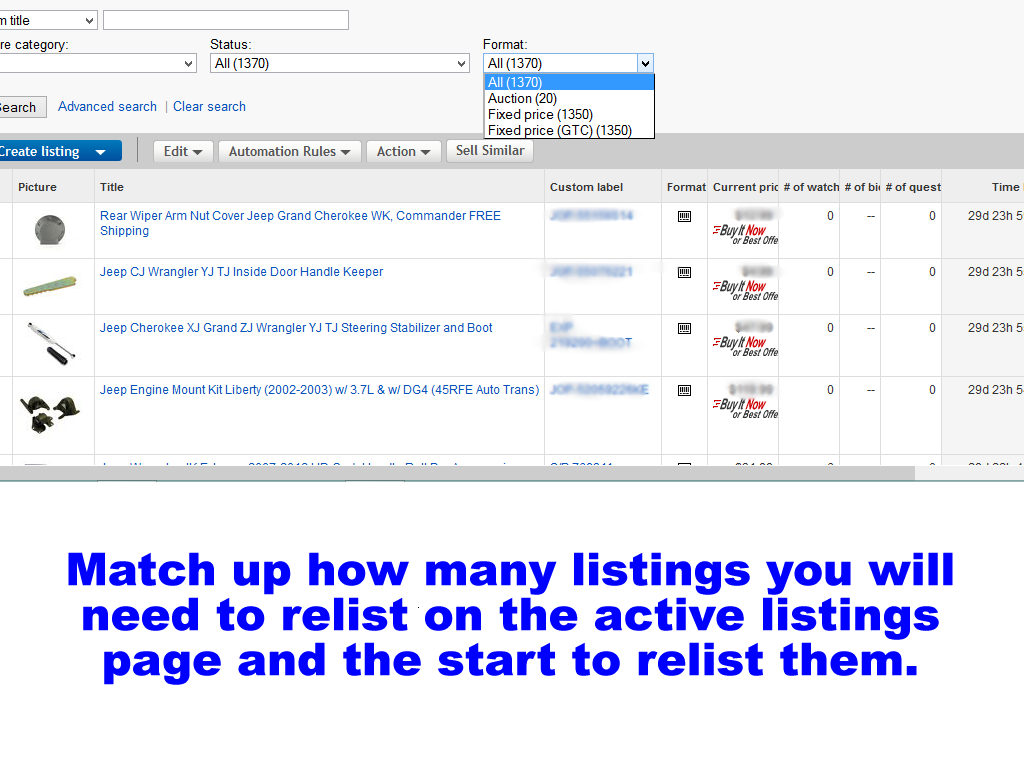
This is the active listings page with with the number of total listings, auction style listings, and fixed priced listings.
Second, we will focus on Step 2 or unsold listings. These will or almost exclusively be auction style listings and GTC fixed priced listings will be relisted from the sold listing pages. So this step is easy you simply go to the unsold listing tab you previously opened and make sure the following boxes are selected.
- Top Left Box – Item title
- Store Category – All
- Status: Not relisted
- Format: All
- Period: All
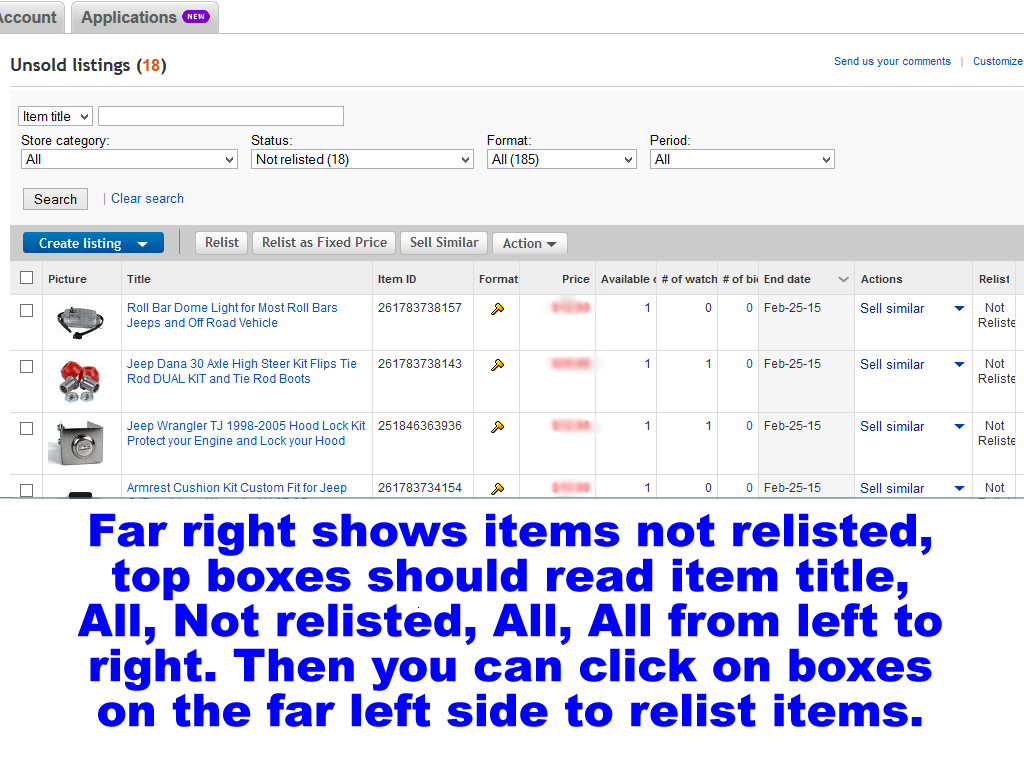
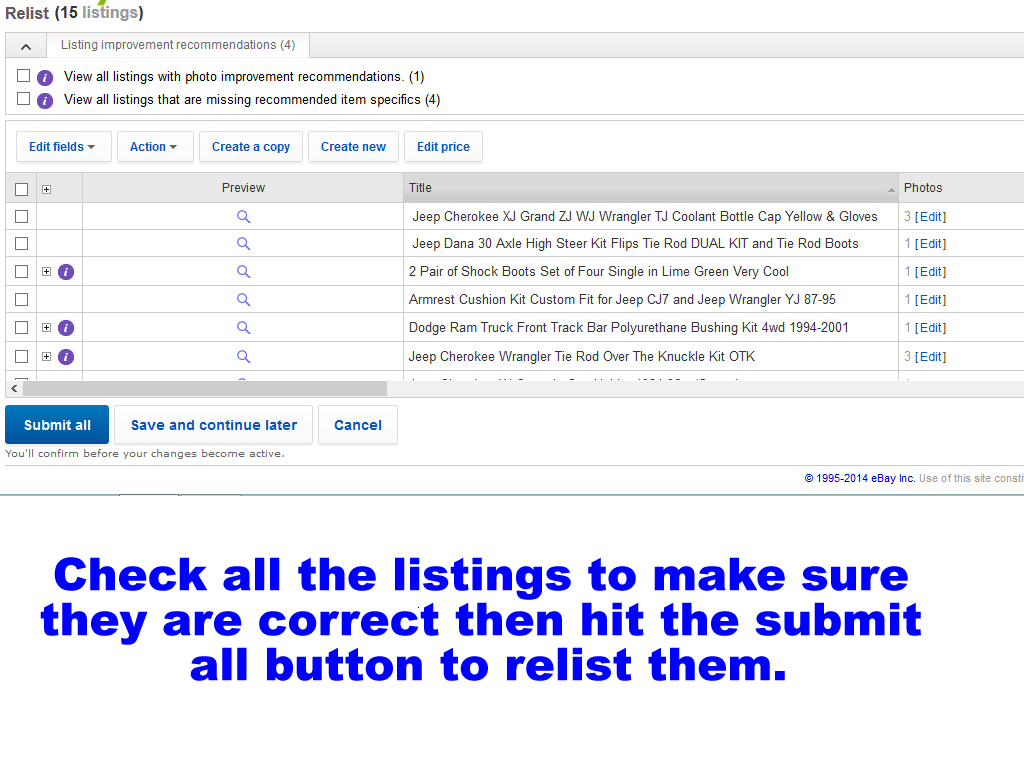
Then the next screen will pop up, and you then can check all the listings to make sure they are good, you can make some quick changes or more in depth changes by clicking on them and then when you are ready hit the submit all button.
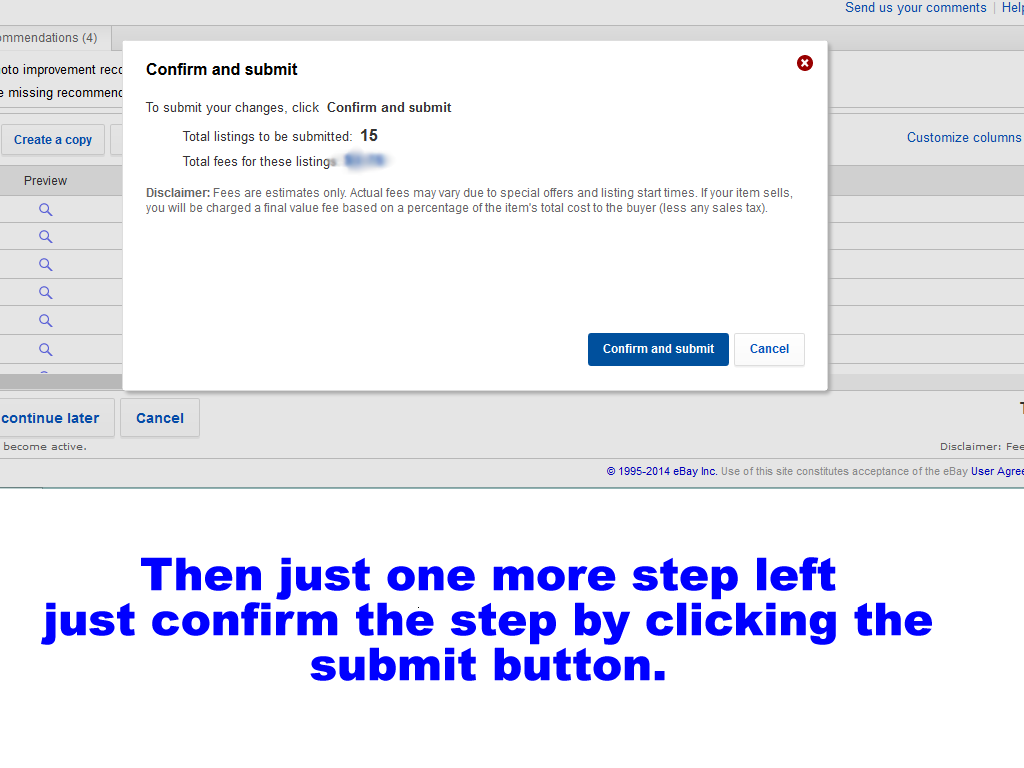
Then the last step is to confirm everything and hit the submit button to finalize your listings.
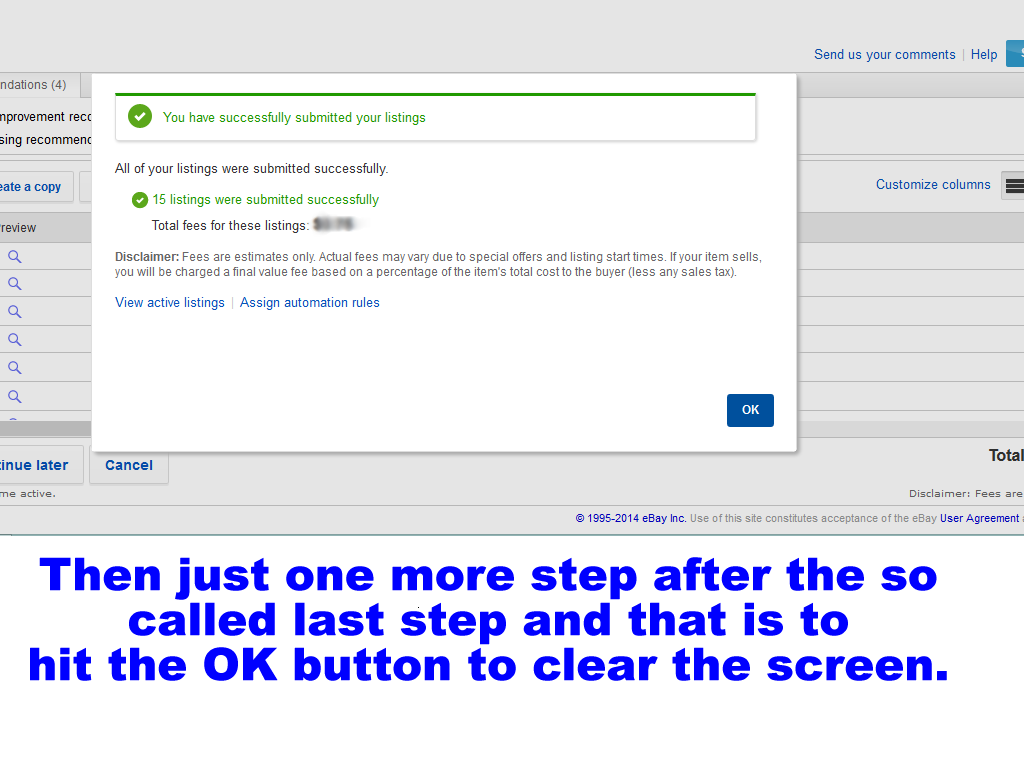
And finally to clear the screen just hit the OK button and you can see that everything is listed if you go back to the unsold listings tab.
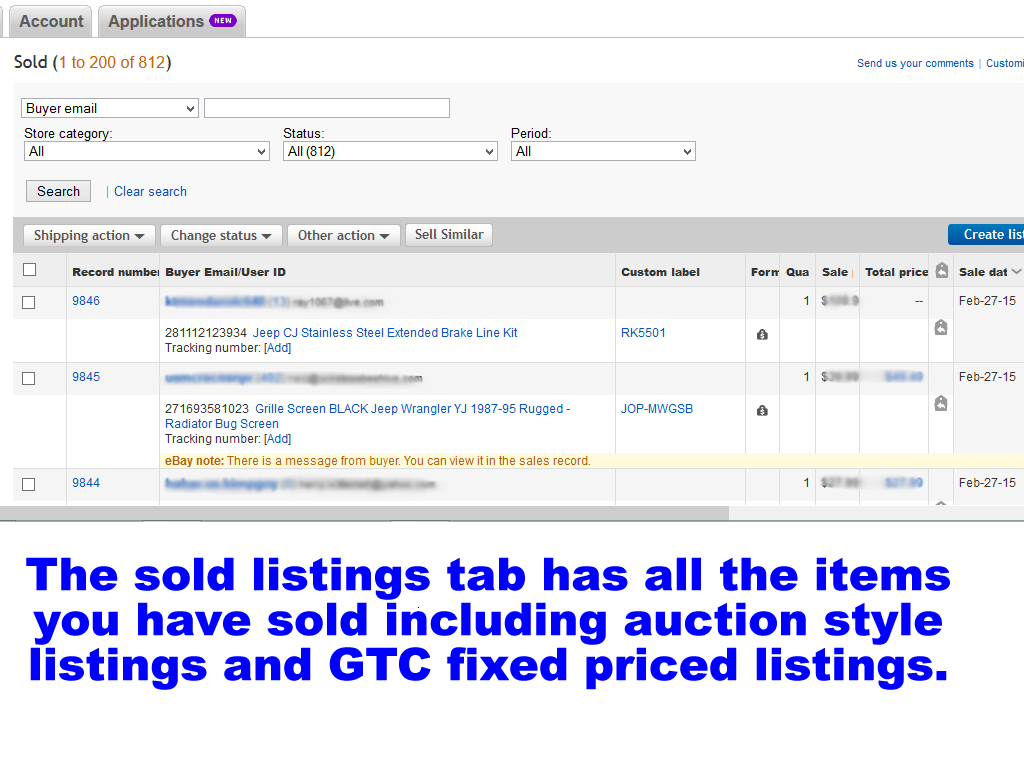
Third we go to re-listing the Sold listings under the Sold items tab, this is done in two parts; first we relist the auction items, and second we go through each sold listing and relist the fixed items that have sold out.
The first thing we will do is find any auction style listings that will need to be relisted. They can be located by looking for the hammer icon in the format column, and an item can be found to be relisted or not by looking at the relist status icon, gray means not relisted and colored in blue means it has been relisted. Remember do not relist already listed items.

Once you have selected all of the auction style listings scroll back up to the top and select the Other Actions menu and then click on the Relist menu item to relist these items.
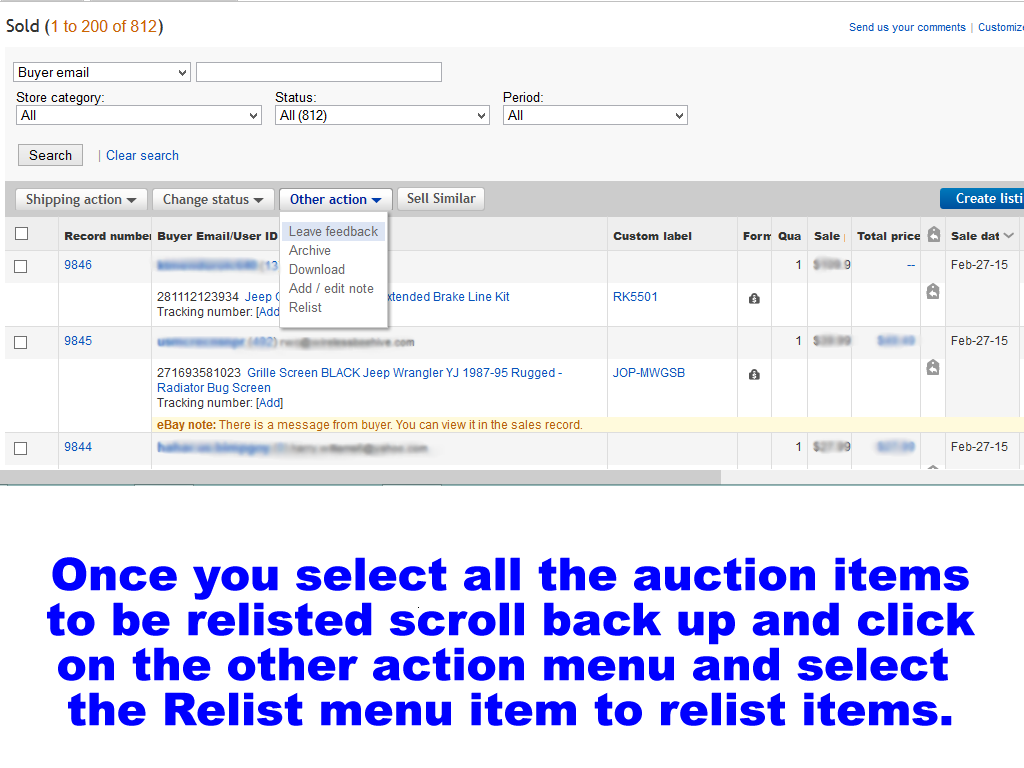
Then like the steps above you will see a Submit All button that you can click to relist the items. Just make sure you make any listing changes as needed. Then after hitting that button then hit the Confirm and Submit button and when ready click the OK button and all the items will be relisted. (see photos above for examples of screens).
Then you can scroll down and locate the relisted items because they will have the relist status icon colored in a black or dark color.

Next we move on to re-listing the fixed item listings that have been sold out of stock and are no longer listed. These are GTC listings that will run until you cancel them or you sell the entire stock out. In the old days you could just put in a large amount of stock like say QTY 1000 items to be sold and not have to worry about this. But eBay found that sellers did not actually have this stock on hand normally so instituted some protections like seller limits to prohibit these types of listings so sellers really need to list actual QTY on hand.
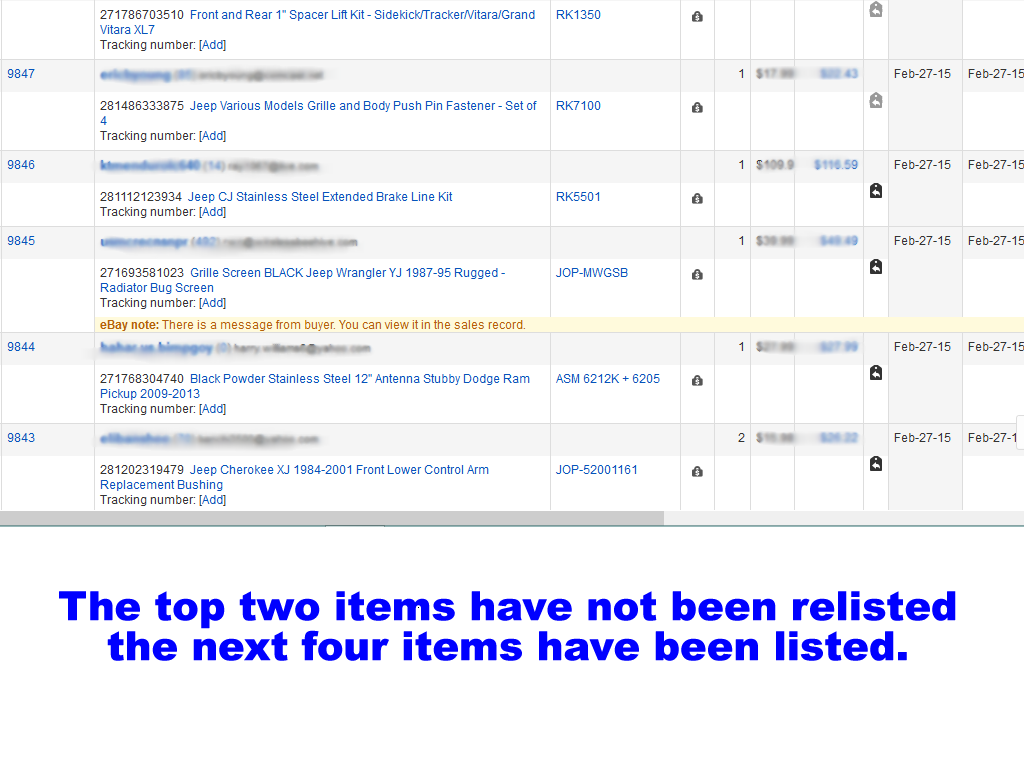
So in preparation for this you want to make sure that you know the last time you did re-listing, or you mark the last sales record you listed on. That way you know you only have to relist to a certain point when starting from the top of the Sold listings. Then starting at the top of the Sold listings tab we look for sold items that are Fixed style listings and have not been relisted.
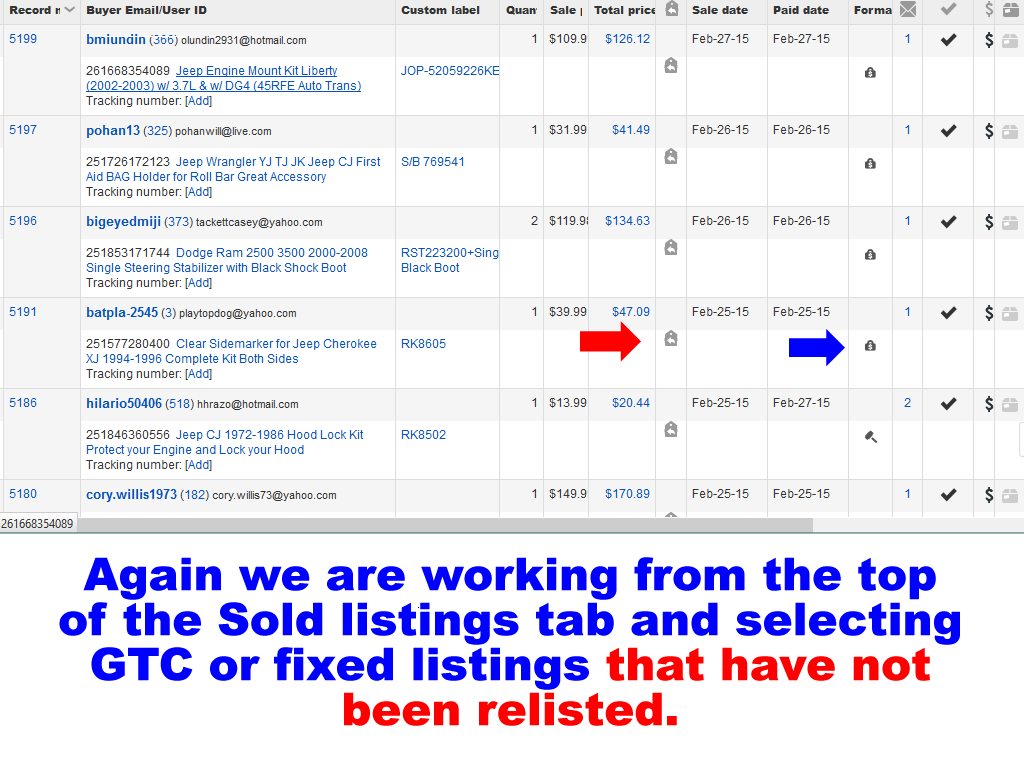
So now we basically click on each listing by right clicking on the listing title and opening up as many as you want to in new tabs. I usually do about 10-15 in new tabs because not all of them are going to need to be relisted.
If you accept any best offers in your eBay offerings then you will have the opportunity to relist items then if they are sold out. Do so then and it will save you time later. They will be marked as relisted in the relist status icon being colored in black. Another quick tip is to refresh you sold items screen often so that you dont accidentally relist the same item you just relisted. This can happen if you offer a QTY of 2 of an item and they both sell quickly together.

Once you open up the listings you will either see a relist on the top or within several options on the top. These are the items which need to be relisted. Listings with items still to be sold do not need to be relisted. Below are two examples of listings that need to be relisted.
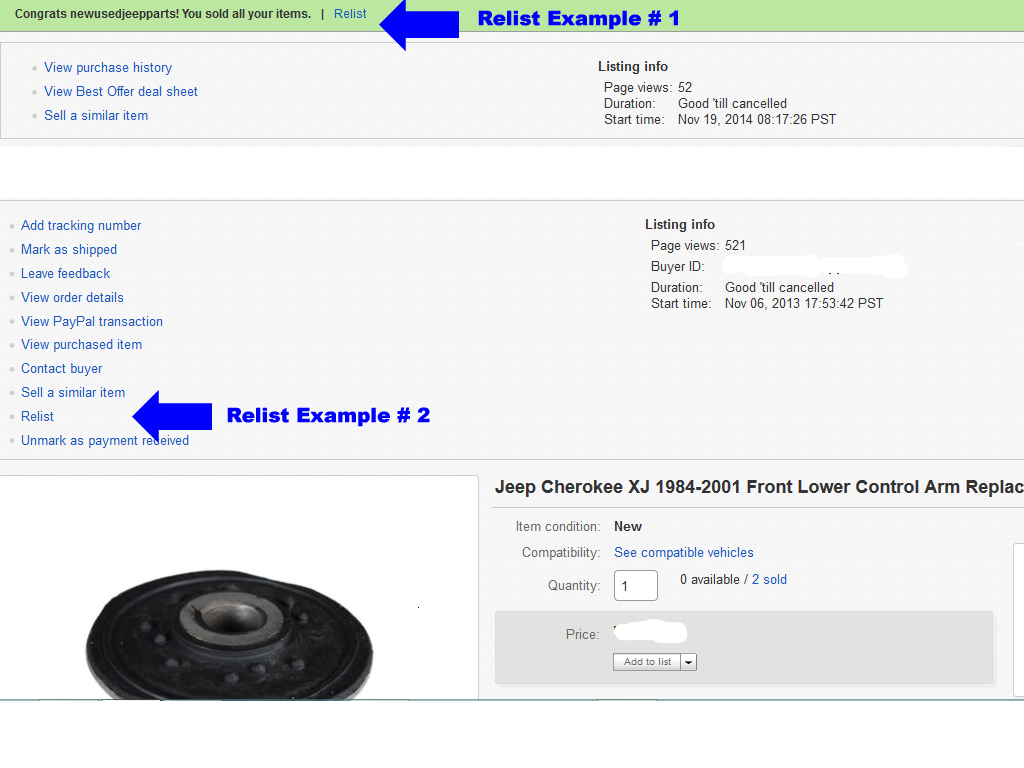
Go through all the listings tabs you have opened and click on relist on any of the two examples above. Then you should see the next screen to confirm the listing is accurate, and if not or you need to make changes then click on the sections or edit the areas you need to change and edit them. Now may be the time to make upgrades to the listing or to make sure everything is filled out correctly. Then when you are done hit the Continue button.
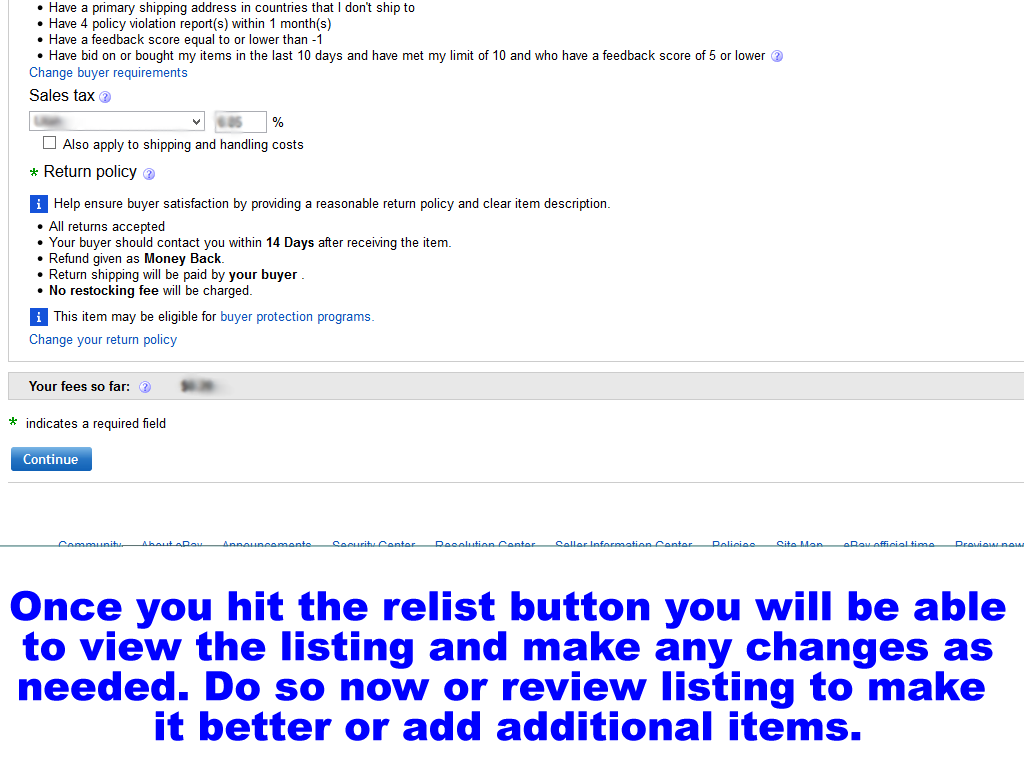
Once the item is to be relisted, then you can select the List your item button, or edit if you forgot any changes.
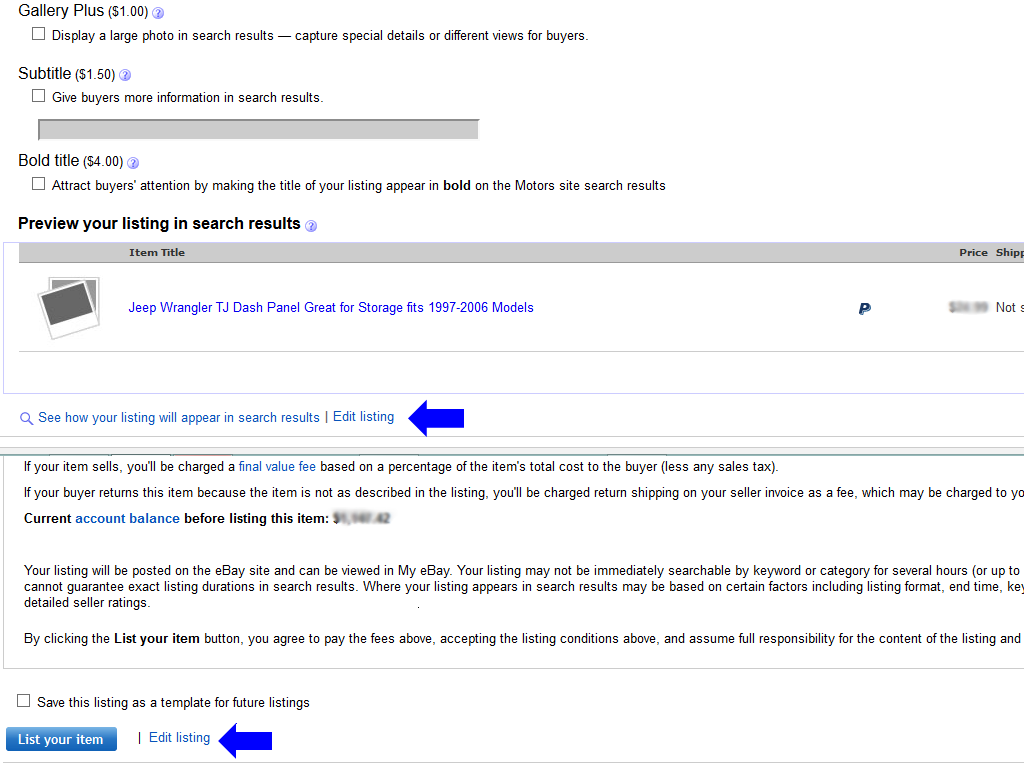
Once you have selected the List your item button you will get the confirmation screen letting you know that your item is now for sale.

Then just keep going to make sure you get all the items in the sold listing tab relisted. Avoid items that have been relisted as marked below, and make sure you refresh your screen after about every 10 listings or so to make sure they are marked as relisted and you dont accidentally relist them.
CONCLUSION
When it comes to listings on eBay you need to make sure they are always relisted and up to date. This makes sure you get the sales because the listings that will need to be relisted are the ones that SOLD! So if you need help please make sure you go over our tutorial and keep those listings up to date.